So far we have seen how we can call native controls from our Xamarin.Forms layouts and even further customize the appearance/behavior of the available Xamarin.Forms controls by overriding their native renderers on each platform. Also we can take an existing a native control and add new functionallity to it by using bindable properties from Xamarin.Forms.
so, in this last part of Xamarin.Forms renderers we will create an Android RadioButton wich will call login on Xamarin.Forms side.
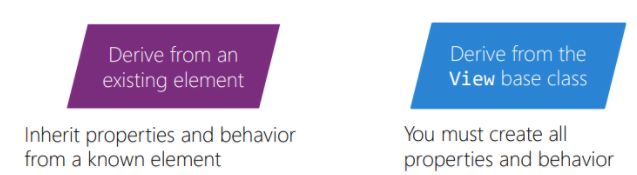
1.- In PCL let's create a new class called CustomRadioButton which derives from View with two bindable properties as shown below:
namespace Ren.Controls
{
public class CustomRadioButton : View
{
public static readonly BindableProperty CheckedProperty =
BindableProperty.Create bool>(
p => p.Checked, false);
public static readonly BindableProperty TextProperty =
BindableProperty.Create string>(
p => p.Text, string.Empty);
public bool Checked
{
get => (bool)GetValue(CheckedProperty);
set => this.SetValue(CheckedProperty, value);
}
public string Text
{
get => (string)GetValue(TextProperty);
set => this.SetValue(TextProperty, value);
}
}
}
2.- In Android project add a new Renderer called RadioButtonRenderer.cs
[assembly: ExportRenderer(typeof(CustomRadioButton), typeof(RadioButtonRenderer))]
namespace Renderers.Droid.Renderers
{
public class RadioButtonRenderer : ViewRenderer
{
private Context _context;
public RadioButtonRenderer(Context context) : base(context)
{
_context = context;
}
protected override void OnElementChanged(ElementChangedEventArgs e)
{
base.OnElementChanged(e);
if (e.OldElement != null)
{
e.OldElement.PropertyChanged += ElementOnPropertyChanged;
}
//Make sure only gets created once
if (this.Control == null)
{
//create native control
var radButton = new RadioButton(this.Context);
//Add native control to Xam.Forms screen
this.SetNativeControl(radButton);
}
//Element is Xam.Forms element associated with this renderer
Control.Text = e.NewElement.Text;
Control.Checked = e.NewElement.Checked;
//Called when there is a change on Xam.Forms element
//When detected,update native control
Element.PropertyChanged += ElementOnPropertyChanged;
}
{
switch (e.PropertyName)
{
//update native control with updated values
case "Checked":
Control.Checked = Element.Checked;
break;
case "Text":
Control.Text = Element.Text;
break;
}
}
}
}
3.- In PCL project lets add our new control to MainPage.xaml like we did before
xmlns:local="clr-namespace:Renderers.Controls"
x:Class="Renderers.MainPage">
<StackLayout x:Name="main">
<Grid x:Name="mainStack">
<local:ClickableLabel Text="Welcome to Xamarin.Forms!"
VerticalOptions="Center"
HorizontalOptions="Center"
x:Name="custButton"/>
Grid>
StackLayout>
ContentPage>
4.- Add new code to MainPage.xaml.cs
public partial class MainPage : ContentPage
{
public MainPage()
{
InitializeComponent();
var floatingButton = new TapGestureRecognizer();
floatingButton.NumberOfTapsRequired = 1;
var rb = new CustomRadioButton
{
Checked = true,
Text = "Custom radio button element"
};
floatingButton.Tapped += (s, a) =>
{
DisplayAlert("Tapped", "native FloatingButton tapped!", "Close");
};
custButton.GestureRecognizers.Add(floatingButton);
var buttonFactory = DependencyService.Get();
var button= buttonFactory.GetFloatingActionButton(() =>
{
rb.Checked = !rb.Checked;
DisplayAlert("Tapped", "FloatingButton", "Close");
});
mainStack.Children.Add(button);
main.Children.Add(rb);
}
}
Now just compile your proyect and you will see RadioButton is being rendered and as soon floating button gets tapped, Cheched property gets updated on native control.
comments powered by Disqus